
Pitch control helps us understand who controls space, while probability models reveal passing options. But combined, can they also tell us where a player should have been, or where he should move next?
In the first article, we defined pitch control and showed how to identify relevant space. The second went even deeper, using different analytical layers and passing option models for pre- and post-match analysis, and hinted that the same logic could drive individual player development. This is the use case we want to explore further in this article.
As before, we examine specific examples and game scenarios. This time, we will show how repositioning can increase the value of a passing option and, with it, the team's scoring chances. We look at an offensive case from the Norwegian Cup Final between Brann and Bodø/Glimt, and a defensive case from Brann's last home game against Sarpsborg 08, where they lost 1–2, exploring how positional adjustments could have changed the outcome.
Offensive Case
Possession Won in the Final Third
The sequence begins with a Brann counter-press which leads to a dangerous break. A loose ball falls to attacker Ulrik Mathisen, who suddenly finds himself behind Bodø/Glimt's defensive line, with possession inside the box.
Although Mathisen is through on goal, the angle favours the defenders. As a right-footed player, he struggles to create a clear shooting opportunity for himself. At the same time, striker Kristian Eriksen is arriving in the box and appears to be a potential passing option.
Mathisen elects to play a lofted pass across the face of the goal, targeting Eriksen. However, the pass bypasses both Eriksen and the recovering Bodø/Glimt defenders before running through the penalty area.
Insight #1 – Evaluating Eriksen's Positioning
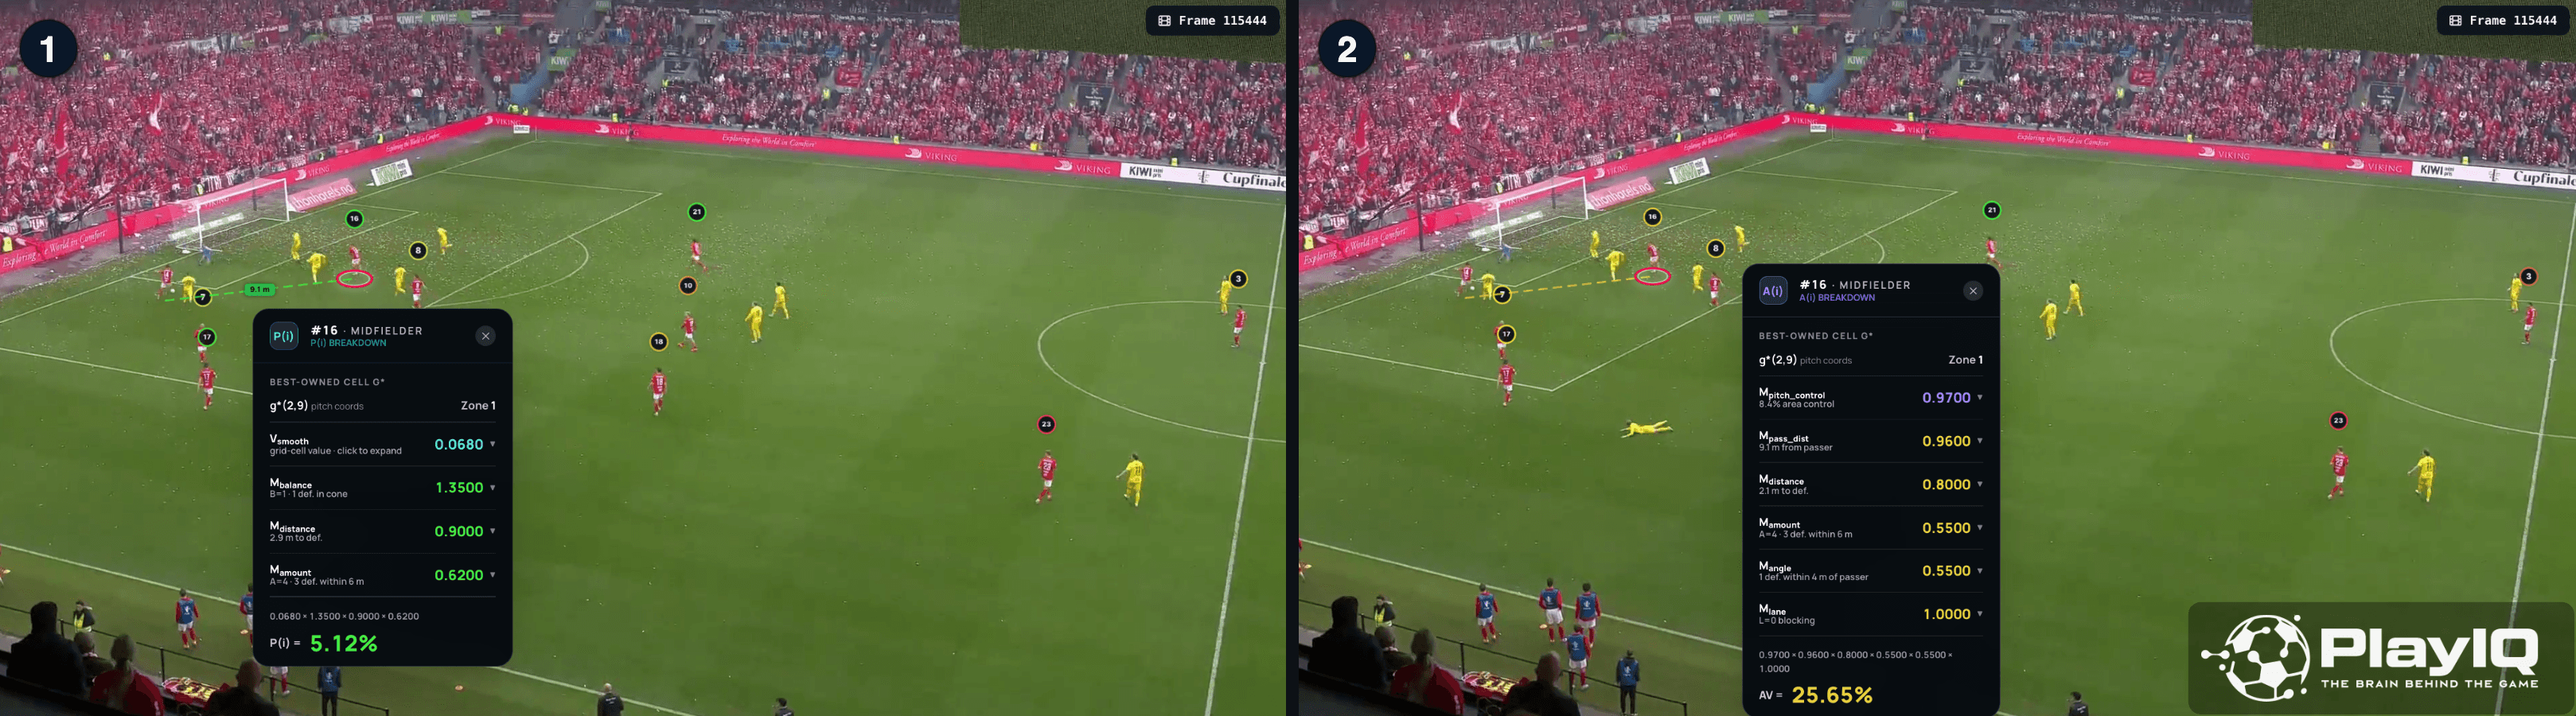
The first frame evaluates Eriksen as a passing option through the probability-based lens introduced in Applied Pitch Control #2, where options are ranked by their likelihood of increasing the team's scoring chances. Viewed through an availability-based lens, however, the option shifts from green to yellow. This suggests that while Eriksen occupies a dangerous position, he may be difficult to reach at that exact location.
So, could he have positioned himself differently to become more available and increase the scoring probability?
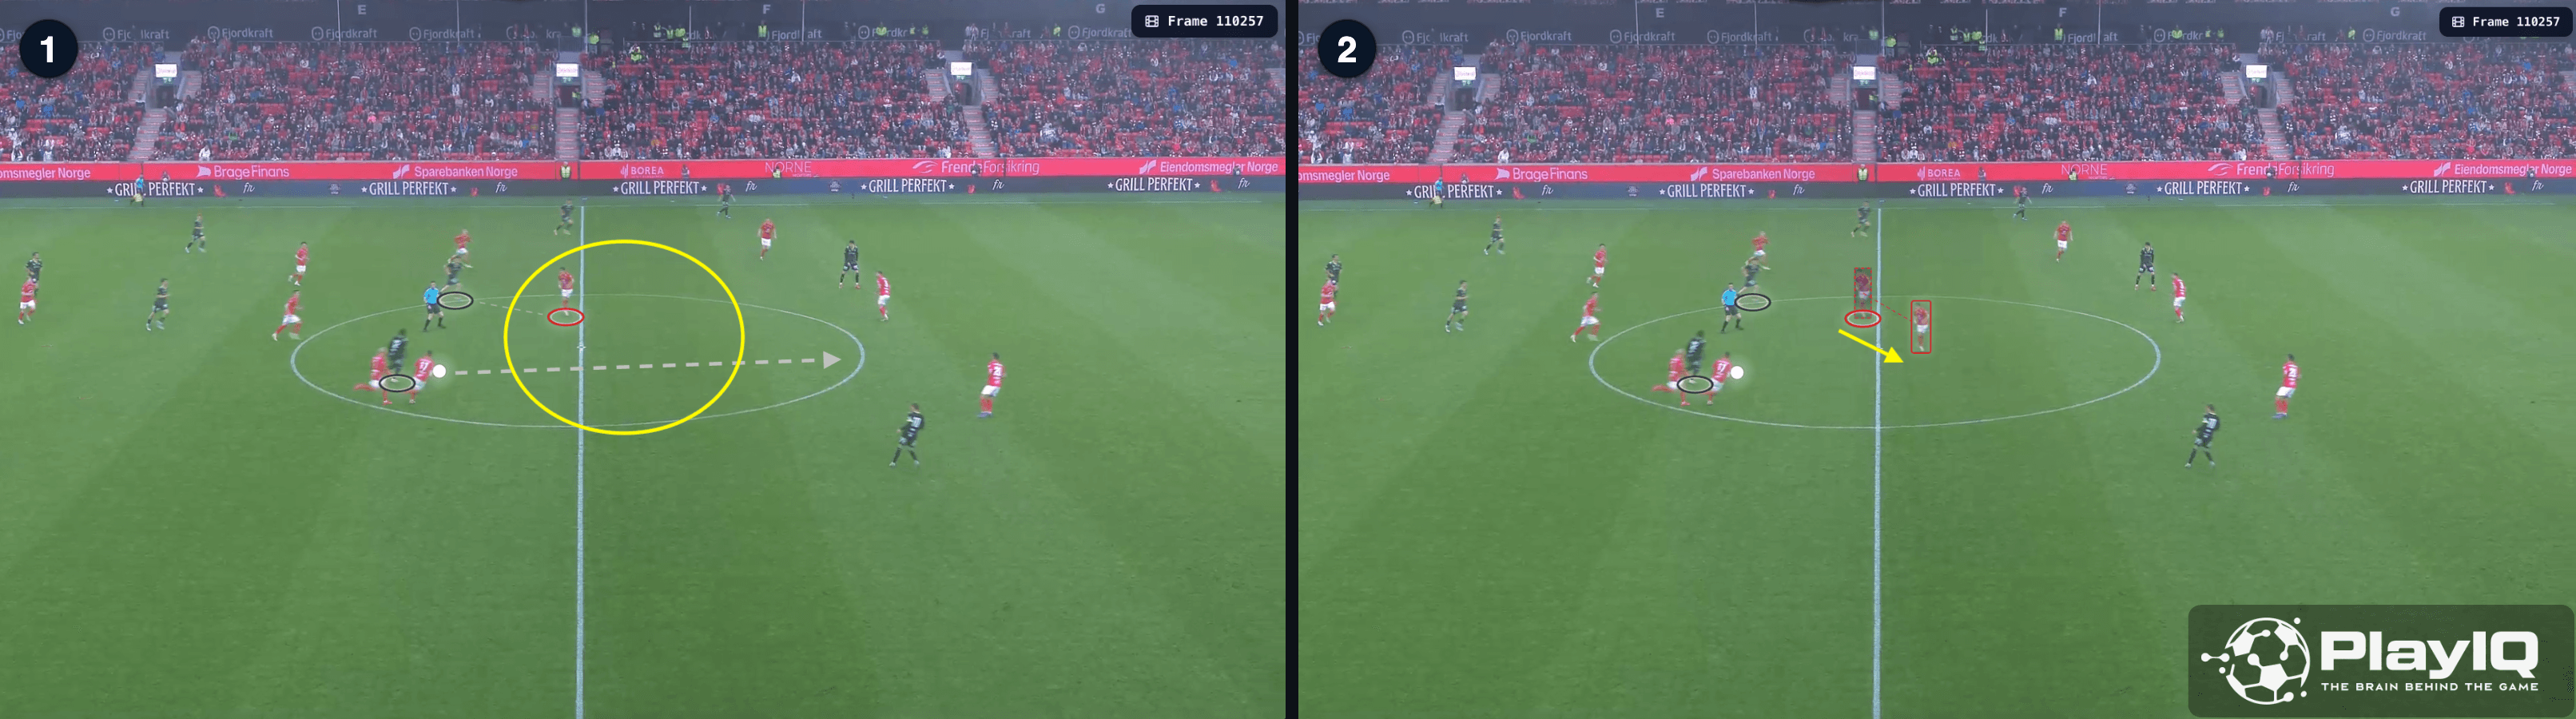
Insight #2 – What If Eriksen Had Made a Different Run?
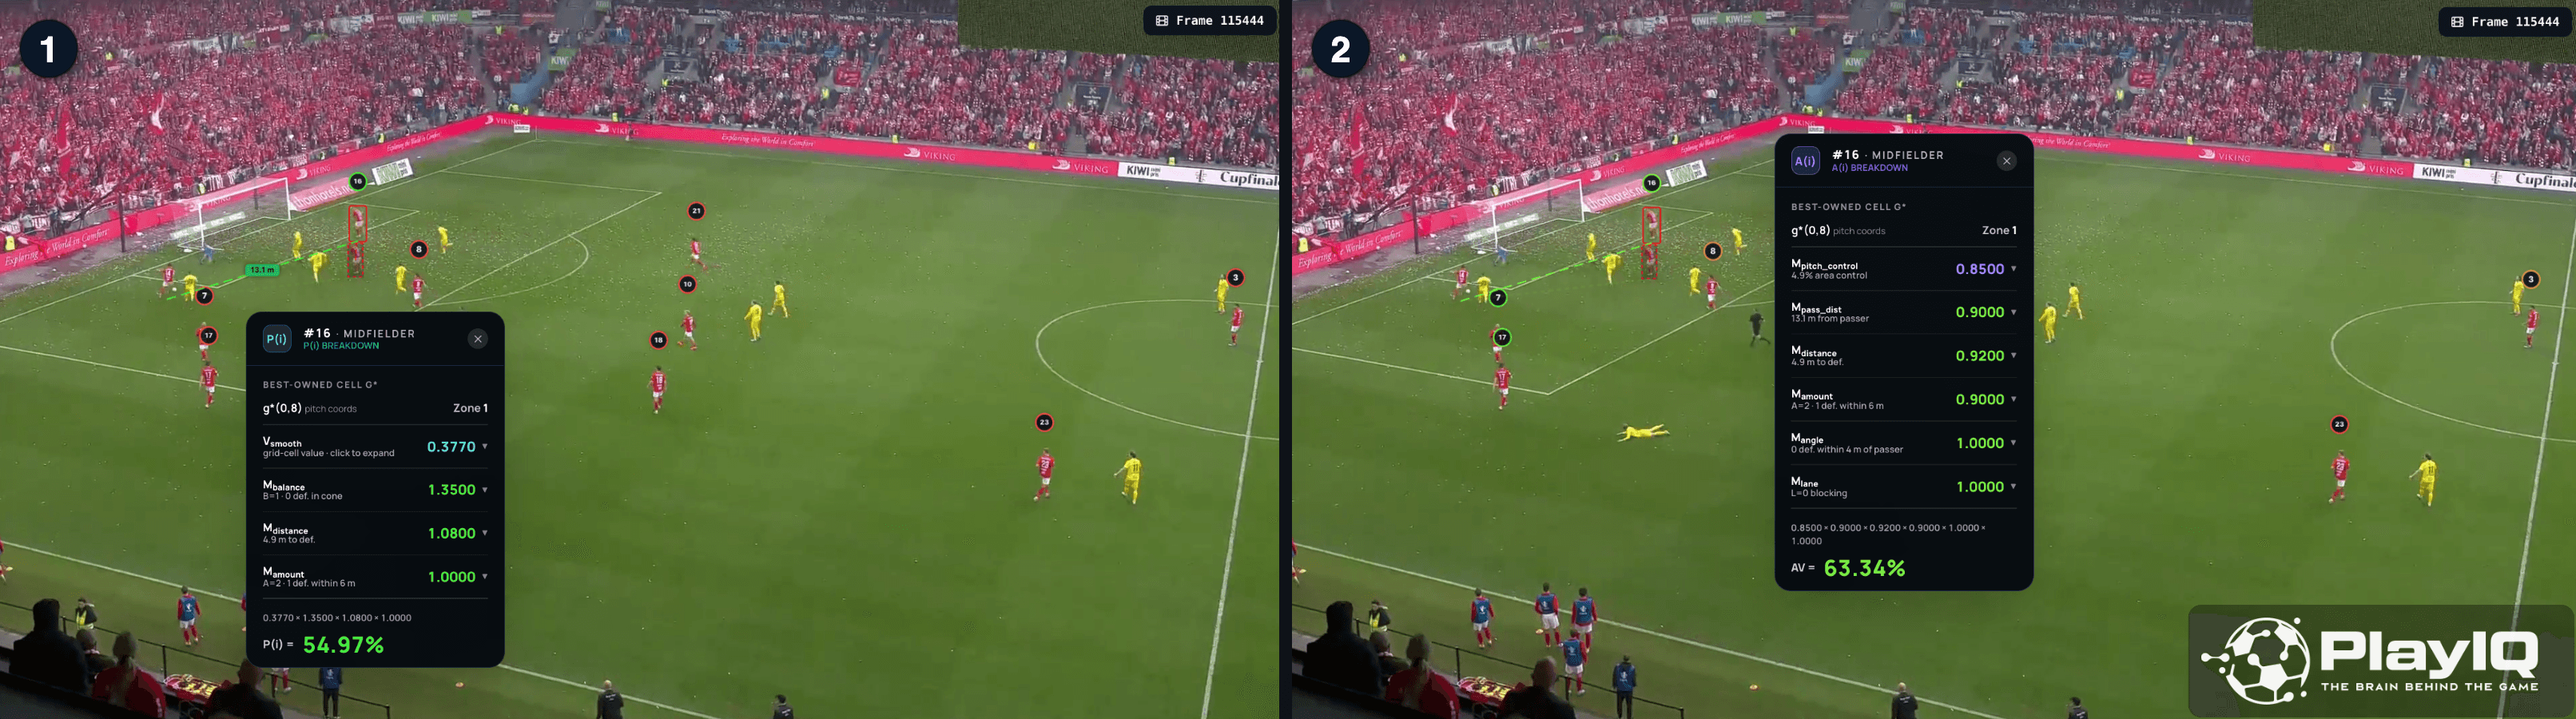
The images above explore an alternative scenario using our repositioning tool to analyse the change in values and availability if Eriksen had positioned himself differently. Instead of maintaining his original run, we have repositioned Eriksen towards the back-post area. This is the exact zone where Mathisen's pass eventually travelled.
By moving into this space, Eriksen's availability score increases due to an improved passing angle and fewer defenders in the way of the pass. The movement not only increases the likelihood of a successful reception but also places Eriksen in a significantly more dangerous area should he receive the ball. In other words, the area targeted by Mathisen's pass represents the most dangerous attacking space available to Brann at that moment, and precisely where our repositioning analysis suggests he should have been.
This example demonstrates how execution and decision-making interact. Mathisen selected the optimal passing location, but the opportunity broke down because no attackers occupied the intended space. While the outcome was influenced by luck and the unpredictable nature of football, it is also shaped by a series of small decisions made in real time.
Defensive Case
A Sequence of Costly Decisions
The sequence culminates in a Sarpsborg goal, but the decisive moment is not a single defensive mistake. The goal emerges from a chain of interconnected errors that progressively weaken Brann's defensive structure and increase Sarpsborg's control of space.
Insight #1 – A Stretched Defensive Structure
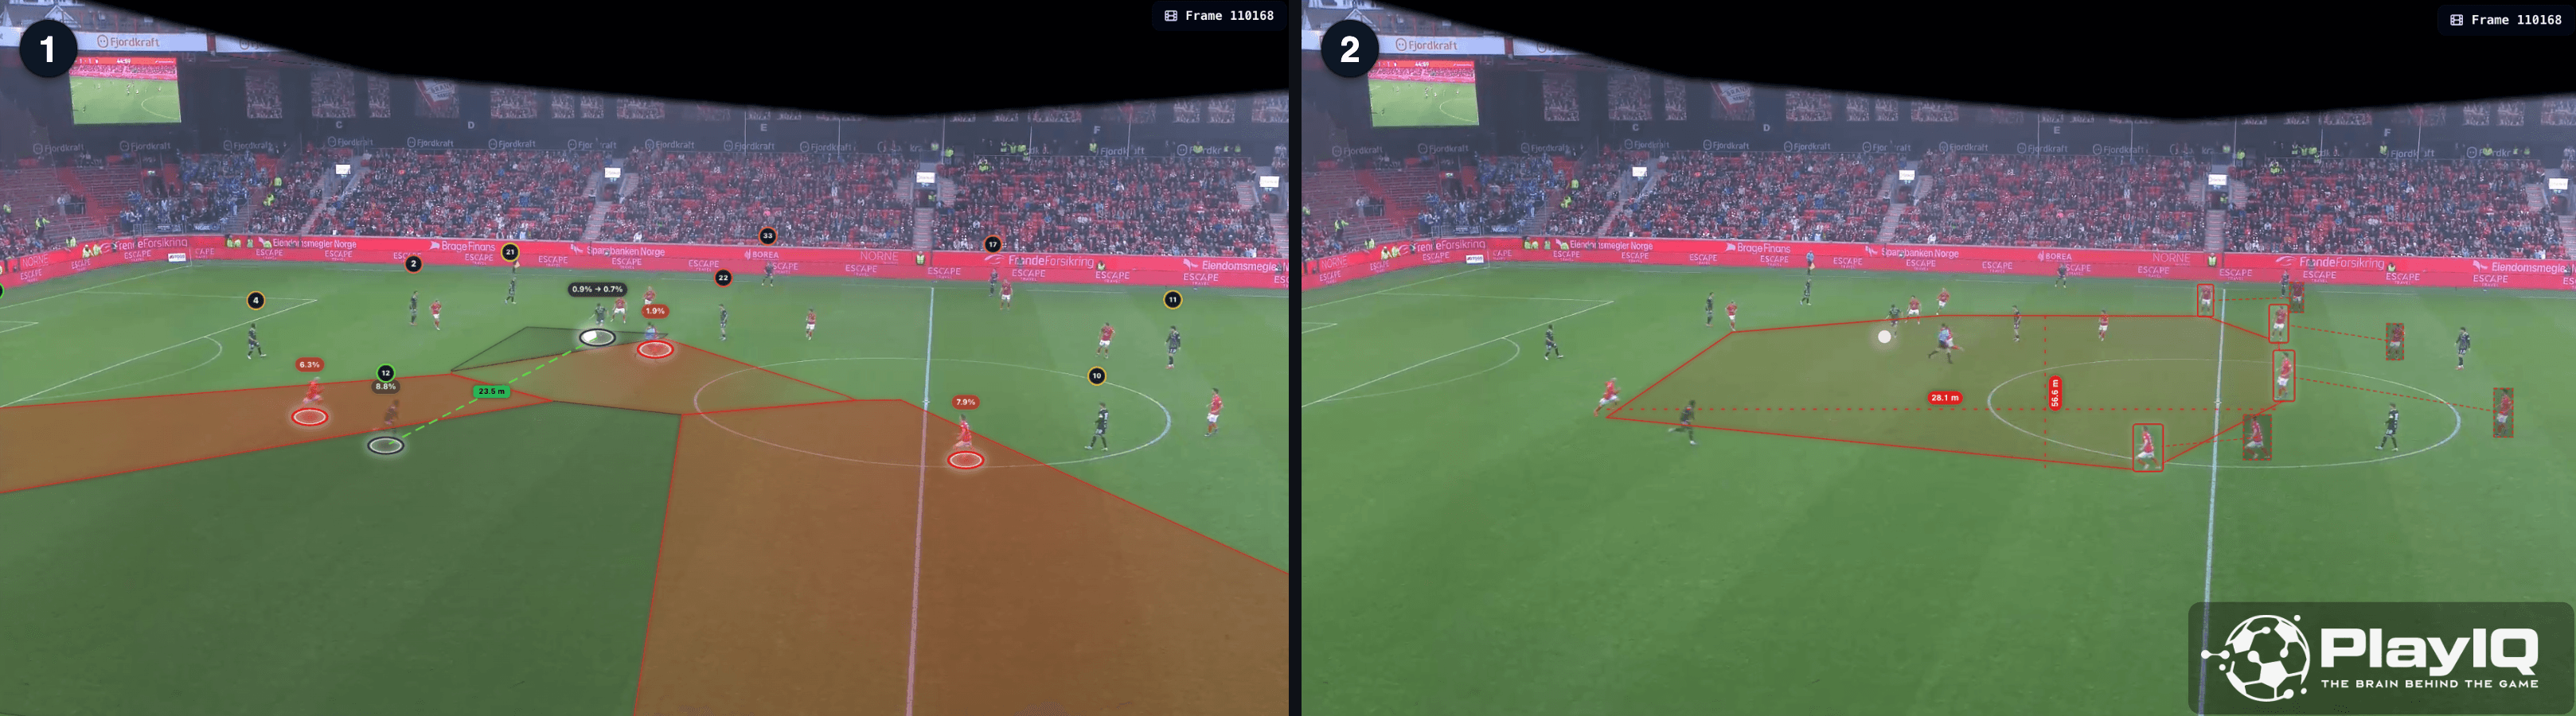
The move begins with Sarpsborg's aggressive high press. Under pressure, Brann are forced to play a long ball towards striker Kristian Eriksen, who is isolated against two Sarpsborg defenders.
The long pass immediately creates a structural problem for Brann. With the attacking players positioned far ahead of the midfield and defensive units, the team becomes stretched vertically. When the initial duel is lost, Sarpsborg are better positioned to compete for the second ball.
The first frame shows Sarpsborg retaining control, with the ball eventually played to Claus Niyukuri, who can receive in space. The failed attempts to press the loose ball have effectively removed five Brann players from the defensive phase, leaving a significant gap between the midfield and defensive lines. The second frame shows how this space could be compressed by repositioning the defensive line higher up the pitch.
Insight #2 – Soltvedt Steps Out of the Defensive Line
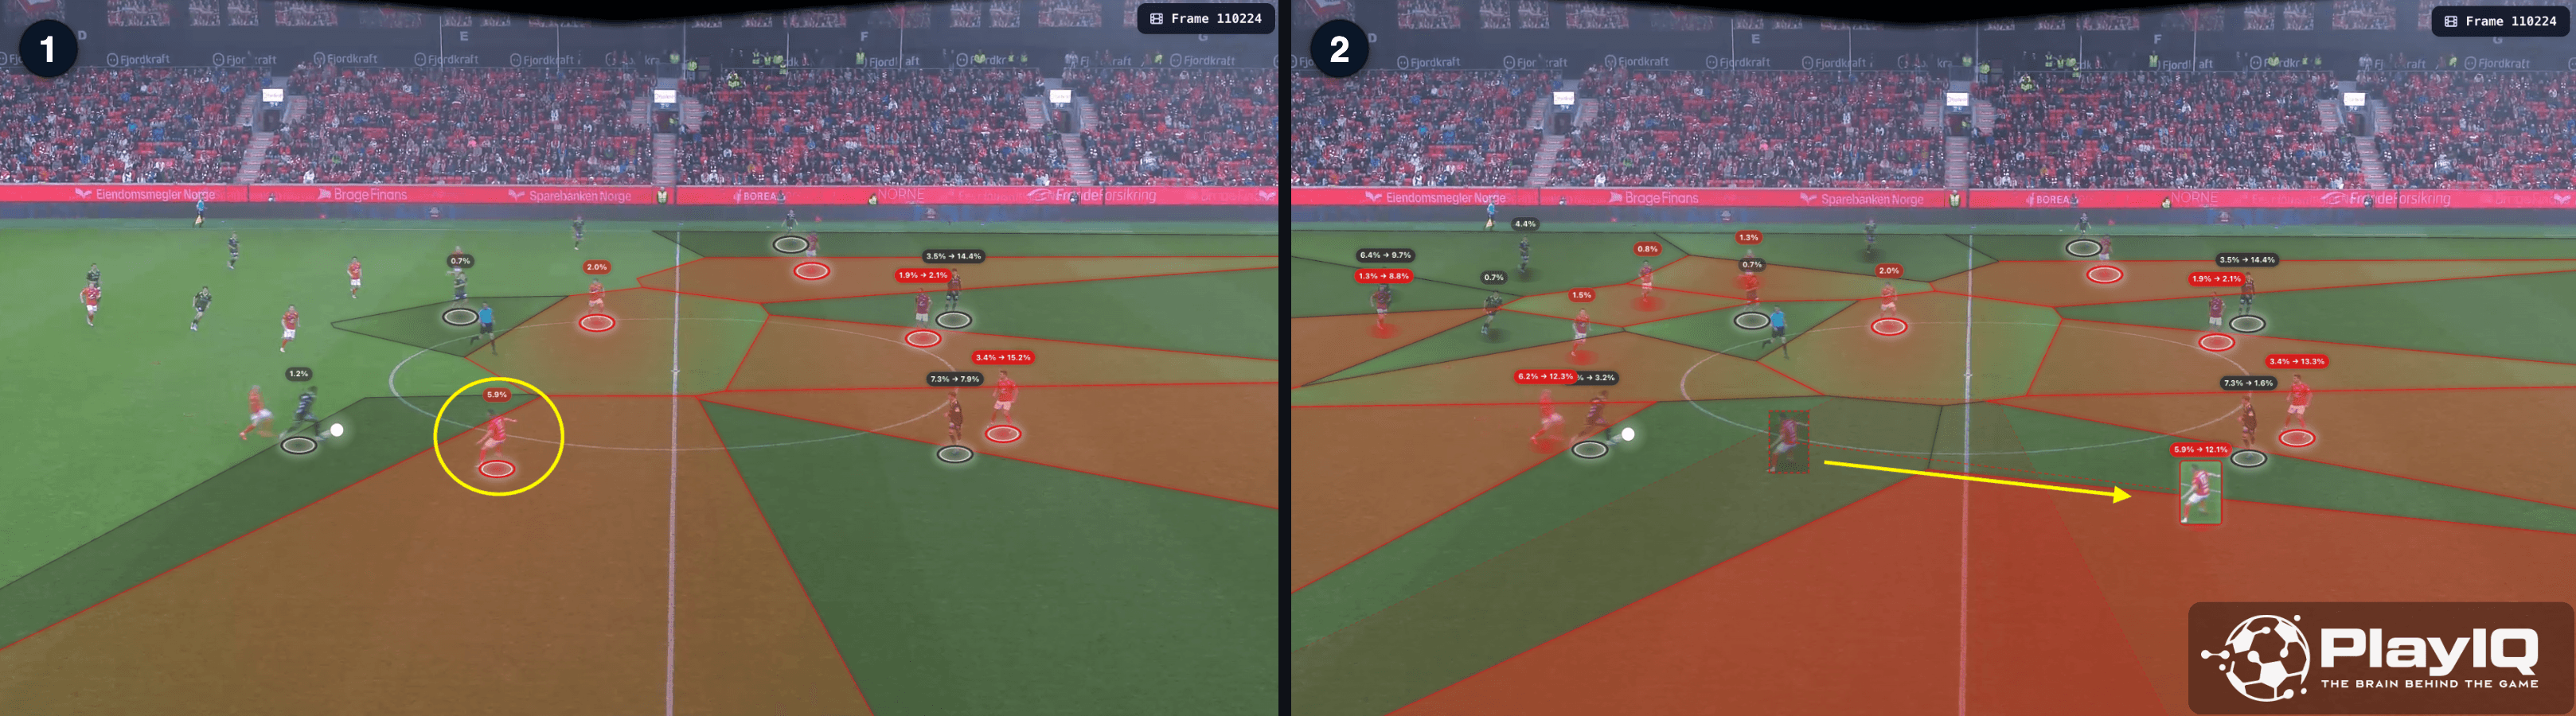
As Niyukuri receives the ball, defender Joachim Soltvedt leaves the defensive line to apply pressure. Although the intention is understandable, the timing and distance of the press create a difficult situation. Soltvedt engages from a position where he is neither close enough to make an immediate challenge nor deep enough to protect the space behind him.
Niyukuri quickly recognises this and exploits the situation. Using his forward momentum against Soltvedt's relatively static position, he bypasses the defender and continues his run. The consequence is not only that Soltvedt is eliminated from the play. His movement also opens additional space for winger Sondre Sørli, reflected in the pitch control, effectively creating a dangerous attacking opportunity.
The second frame shows the impact of repositioning Soltvedt back into the defensive line. In doing so, he retains relevant pitch control. This is a trade-off that prioritises the threat of the opposing winger over the space the full-back could run into.
Insight #3 – Insufficient Cover Defence
At the same time, midfielder Niklas Wassberg is in a position where he could potentially step in and slow down Niyukuri's progression. However, Wassberg is also responsible for tracking the run of midfielder Victor Halvorsen, who is advancing in support of the attack. Faced with two competing threats, he hesitates between protecting the passing lane and engaging the ball carrier.
This moment of indecision allows Niyukuri to continue his run unchallenged. Rather than forcing the attacker sideways or backwards, Niyukuri is allowed to carry the ball directly towards the defensive line.
By the time Niyukuri reaches the final defensive line, Brann's earlier mistakes have created a difficult numerical and spatial dilemma. Defender Vetle Dragsnes is forced to make a choice: stay connected to Sørli and protect the wide threat, or step across to confront Niyukuri's central penetration. With Niyukuri driving directly at goal, Dragsnes chooses to engage the ball carrier. While understandable, this leaves Sørli unmarked. Niyukuri exploits the newly created space by playing the ball wide, and Sørli finishes to score.
The initial long ball stretches Brann's structure. The inability to compete for the second ball creates excessive distances between the lines. Soltvedt's attempt to step out opens additional space, while the lack of effective cover pressure allows Niyukuri to continue advancing. The other individual decisions appear relatively minor in isolation. Together, however, they create a cascading effect that progressively increases Sarpsborg's attacking options while reducing Brann's defensive control.
Summary
In this article, we have highlighted how the outlook of a situation changes when players are repositioned in decisive moments, and how this affects both pitch control and passing options.
By comparing a player's actual position with alternative positions, we can identify movements that create more attacking opportunities or improve defensive coverage. Beyond post-match analysis, the same approach has clear applications for individual player development, helping players better understand which positional decisions give their team the greatest advantage.
Interested in learning more about PlayIQ and how you can access our analysis tools? book a demo with us here.


